Mushroom paper
Soak overnight and then chop up in small pieces and blend with lots of water. The slurry in the bath as Jenny used it worked to pull the frame through. I found the dripping method easier to work with.
New Zealand Flax paper
Cutting the strips by using the extended aunts and uncles and cut at 90′ from top to bottom to prevent rain water running into the plant.
Stripped the flower’frog’ to get thin and even strips, then hammered on a stone a bit and chopped up. Put in pot with cold water, add Caustic Soda and cook for a few hours – weakens the fibres, need the strips to become lighter in colour. Drained the water and rinsed the fibres, added Caustic Soda and cook again – keep stirring, want a lighter colour.
Pouring worked better than putting it into the ‘bath’.
Making vessels:
Choose a nest-like base — a small bowl, a bundle of twigs, or a loose wire mesh shaped by hand.
Line it with a piece of fine mesh or natural cloth (cheesecloth, muslin) to act as a separator and support for your pulp.
This form is only temporary; it allows the pulp to hold its curve while drying.
Salix Mucronata branches for weaving – (kyk na Cape Willow Sasaf)
- Salix mucronata can be used for various weaving projects, from small baskets to larger garden structures.
- It is used for making baskets, cabinets, crates, and other decorative and functional items.
- Woven structures such as screens, hurdles, or garden edging can also be made from the branches.
I used branches to weave into the forest – It became a type of canopy around a tree and I would like to weave into the smaller negative spaces which became more visible during the weaving with the branches around the tree.
The thick thorns – fascinating as hooks, connecters
Using the burlap
Containers – carry something in them. Can we imagine the burlap sacks not as “materials” but as mediators between Annette, me, and the forest — holding, filtering, listening, decaying, and transforming. “What does using the sacks reveal about care — and what does it ask us to let go of?”
Go for a walk in the forest, each of us with a bag containing a question about why we want to collect, and consider what the forest is offering us.
Ouman se baard (Marissa) residue
Cooked in water , ink – changed to Lake Pigment by adding Allum and Wash Soda gooi deur koffie filtreerder
Myne is droog – added it to paper I made
Rooi mushroom ink – chopped up and simmer slowly
Considering rubbings – I like the idea that this act of rubbing can become a gesture of empathy — tracing the skin of the tree without taking from it.
Perhaps document the sound of rubbing, your body’s movement, or the shifting pressure — the conversation of touch could itself become part of your work.
I made two rubbings on trees with the flax paper – it was recorded.
Wet Media (for absorbent, organic surfaces) – consider earth pigments
- Collect local earth or clay, grind it, and mix with a little binder. Apply using a cloth or your hands to make prints or rubbings.
- These will stain rather than sit on the surface — so the mark feels embedded in the paper, like a dialogue between skin and ground.
🧈 Graphite and oil blend
- Rubbing graphite mixed with a touch of linseed oil on fabric (like muslin or thin flax paper) can create beautiful, soft silvery impressions that resist smudging and feel almost like shadows.

Whilst being in the forest I had the feeling of being overwhelmed not just by the beauty of the space, but by the possibilty of working with the forest as our material and co-collaorator. How to keep the flow of making with? Words that challenge me are: porous, absorbent, unpredictable. Can I also introduce fabric I brought from home(muslin, raw linen, old clothing)? I would think that this would allow for soft rubbings that could be bound, hung, in the forest and I can take them home and stich onto them. I feel this could tie to my idea of binding and of refusing binaries between art and life, making and using/wearing.
Making a drawing machine using the wind:
These windy days at Blomerus had me thinking about how to work with the wind – the idea of making a drawing machine with the ‘ropes’ hanging from the forest captured me on Sunday when we were working on site. I hope to find a space where a ‘wooden table’ is also available to act as a surface and fasten the papers with the thick thorns found on the asparagus creepers. The aim of the project is to cause marks to be made without my own movement, or where my intervention is just incidental. I had to find something which moves, attach a drawing medium, and make an ‘automatic’ drawing.
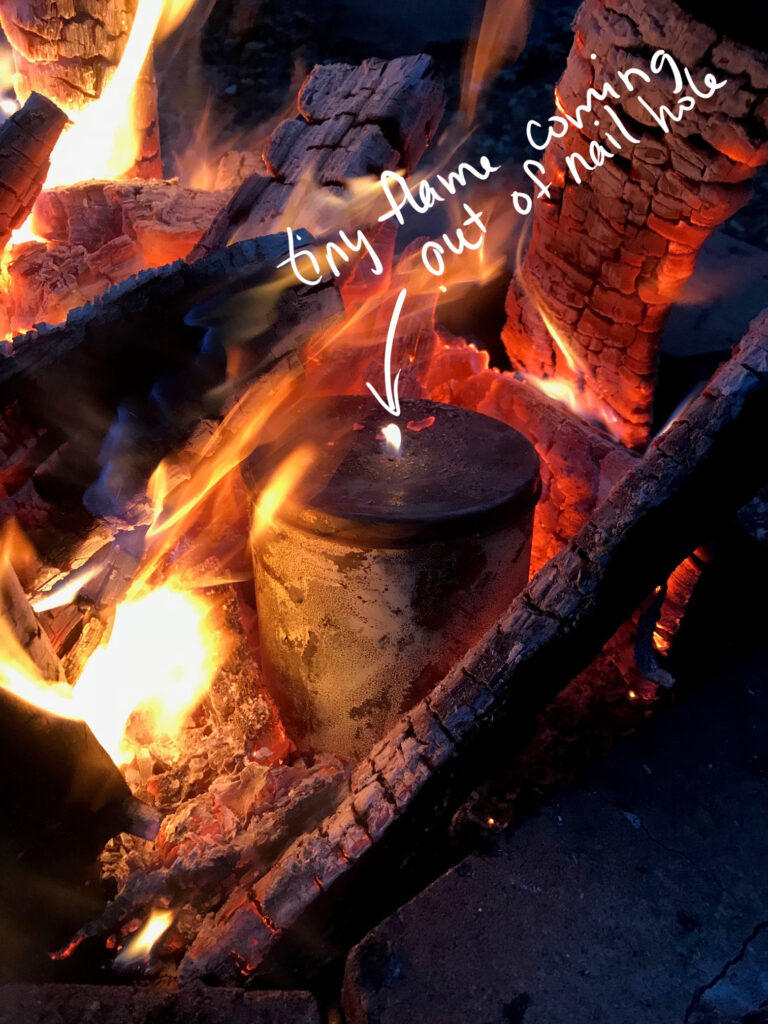
NIcky will assist in making charcoal with local found sticks – I collect willow and Rhus. She has a metal container and I learn that it should mostly air-tight when sealed. If the lid doesn’t latch well, use a little wire to ensure it stays shut during the cooking process. It is important to control the amount of oxygen entering the container. You also place a small nail hole on the top side of the container. My reading/research into this method also suggested that the branches can vary in width. Nicky suggester they be about the width of a pencil or a little larger. The research suggest that one can either leave the bark on or peel it off. Peeled pieces will result in charcoal with a more consistent texture throughout.
Cooking: Will do in the fireplace in the house; It seems it will be good to build the fire around the container. Once the container is immersed in fire, it should cook for about an hour or a little more. You may see a small flame coming out of the nail hole you pierced in the top. That is fine, and is just a sign that the volatile gasses are still burning off of the wood inside – but make sure your container doesn’t open up to allow too much oxygen to flood in. If this happens, you may just end up with ashes. After an hour or two, you can let the fire slowly die around the container, or remove it from the fire to a safe location where it can cool. DO NOT OPEN the container until it is completely cooled. The contents are very hot, and if you open the container, the contents WILL burst into flames. Seriously.
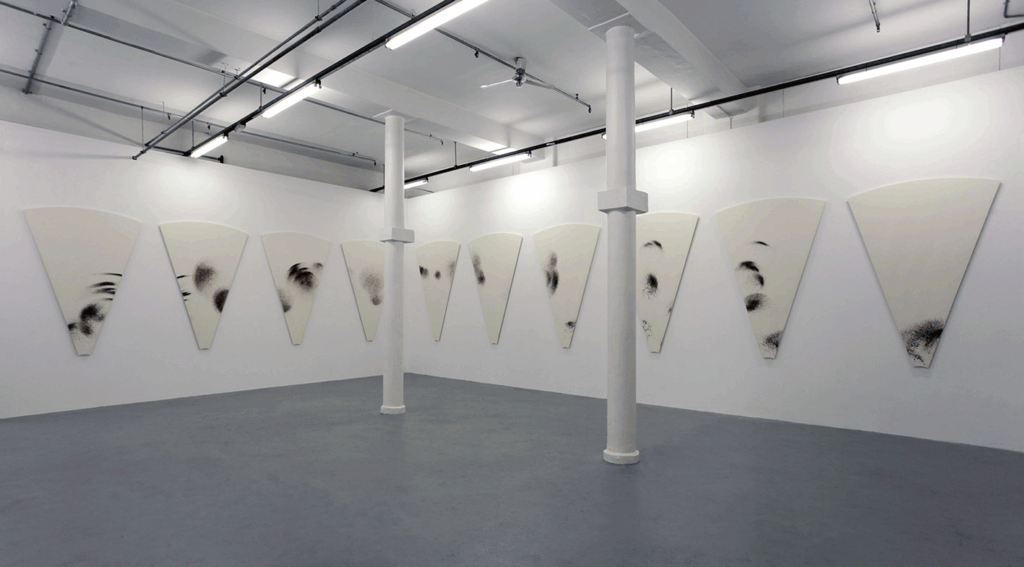
Rebecca Horn has used drawing machines of her own invention. Her biography and an account of her work is at https://www.theartstory.org/artist-horn-rebecca-life-and-legacy.htm . I will continue to explore and research more. Tim Knowles also experiments with wind drawings – his drawings are produced by pens attached to the tips of tree branches, as the branches move in the wind the tree draws on to a panel or drawing board on an easel. He describes these drawings as “signatures” – such as that the tree drawings tell of the tree’s character. He suggests that a Hawthorn produces a stiff, scratchy & spikey drawing an Oak a more elegant flowing line. The work below was made around a weeping willow tree:
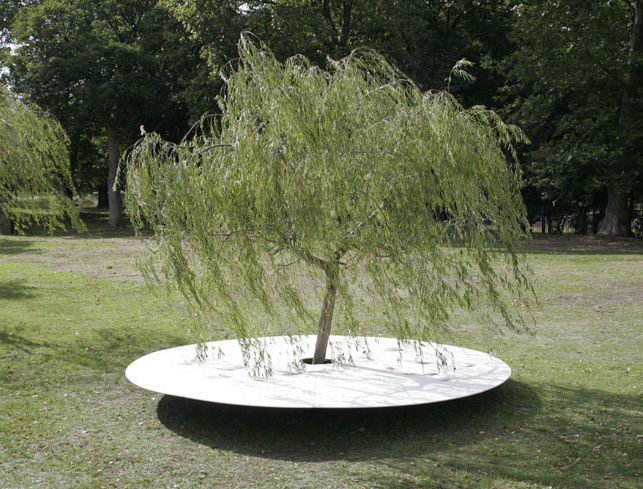
The artist attached 100 pens to the branches of the tree, and the drawing was done onto a circular disc of 5.1 metres in diameter, made up of 10 segments as seen below.
I also started thinking of working with this process, where the ‘drawing machine’ makes repetitive and random marks; it is the unpredictability and the novelty of it that I enjoyed – it reminds me of not being controlled by your hand/brain, but movement is somehow left behind/captured as a trace or mark. I wonder if this could aid my need to draw more expressive and less controlled by what I see?
Papermaking
Instagram account: atelierretailles
Collect fragments — thorns, tendrils, dried stems — not as specimens but as participants. Their forms already speak of defence and attachment.
Using the yellow leaves around and onto things – it will not stay as I started ‘curating’ them – I am not even trying to ‘attach’ them – I just place them
Handle them slowly, noting where they pierce or resist. Your body’s small negotiations with the thorns become a kind of co-making — the plant setting limits.
You might even create a performative ritual: how close can I come before I must retreat? This connects with your interest in vulnerability and boundaries.
Working with rubbings of the trees in the forest
Making ideas
- Thorn impressions: Press them into soft paper pulp or clay, letting the punctures form a negative drawing of pain/protection.
- Suspended “snare” forms: Thorns or thorny branches intertwined with your wire works could create hybrid “nests” that seem both inviting and dangerous.
- Shadow drawings: Place thorny stems between light and paper — trace their silhouettes as fragile maps of tension.
Handmade or Plant-Based Papers (embodied, organic feel)
✨ Flax paper (your own or locally made)
- Why: It connects directly to your process — flax is a non-native species, so using it introduces that tension between belonging and displacement.
- Texture: Slightly rough, fibrous; takes charcoal well when dry, and even better when slightly damp (the fibres open and receive the pigment softly).
- Tip: Try layering thin sheets, so that the rubbing “ghosts” through to the next — echoing how memory transfers in your practice.
🍄 Mushroom paper
- Why: Symbolically rich — made from decay and regeneration.
- Texture: Porous, absorbent, slightly unpredictable; it might fragment under pressure but that fragility can mirror forest ephemerality.
- Tip: Use it for smaller, detailed rubbings (on bark textures, snails, or fallen branches). You might even let some disintegrate back into the site later.
Making water colour with earth pigments
Gum arabic 1:2 water
Mix in morning and Nickey will get the mullar and slab
Levigation: to get rid of impurities (earth pigments
Forest Bathing? Custodians —– words we use to explain why we want to make work in the forest. Is this not another presumption of Western terminology for a need; what about being with nature?
Tim Ingold describes walking as tracing lines of wayfaring — lines that connect rather than divide. Each being follows its own tempo: trees grow, water flows, a snail draws its persistent trail of slowness. To walk attentively among them is to honour the multiplicity and polyphony of life and to accept that there are many ways of moving through the world.
Interesting this use of information/signage which came up in our ‘curating process’. Are they acting like reminders of place?
The ideas about almost hiding/finding the objects took me to think about ‘truths’ which are buried in the history of the place, we do not know it. How to unearth hidden histories and challenge established narratives that colonial perspectives have shaped. I came here with the idea to weave with leaves, plant fibres: I like the idea of making cordage for binding and enjoy plaiting fibres to bring things together. Does this idea of bringing together in my making and curating also talk about the theoretical and the lived; the impersonal and the deeply personal?
Thoughts for the ‘exhibition’: To weave is to bind what history separated.
To plait is to hold tension between memory and forgetting, theory and touch.
Each fibre is a line of correspondence, each knot a small act of repair.
De-colonising the forest:
How do I look at indigenous peoples’ rights – to identify and uphold indigenous peoples’ rights of ownership and use of land and resources?
Weaving and plaiting embody a different epistemology:
- Theoretical thought (ideas about visibility, history, colonial gaze) and lived practice (hands, fibres, the forest floor) are literally entwined.
- Each strand holds tension and care — an image of interdependence rather than hierarchy.
In this way, our work aims to refuse the binaries that colonial frameworks established:
| Colonial Logic | Your Weaving Counters With |
|---|---|
| Subject / Object | Interrelation: weave directly into what is already there — low branches, roots, or fallen trees — letting them dictate rhythm and structure. |
| Human / Nature | Co-making: drawing machine |
| Observer / Observed | Immersed participant: |
| Knowledge / Feeling | Entwined experience: weave with the woven |
Looking at curating as binding. The found materials like flax, snails, mushrooms, and paper bowls create a constellation of meanings — all rooted in the site, yet open to wider reflection on belonging, repair, and coexistence.
I am thinking of the following as a possible holding thought: To weave is to bind what history separated.
To plait is to hold tension between memory and forgetting, theory and touch.
Each fibre is a line of correspondence, each knot a small act of repair.
The way we curate the work in the forest space — arranging, tying, guiding- enacts this bringing together.
We can present the installation as a woven field of relations, where:
- Each indicator (a tied fibre, a burlap pouch, a nest) is a knot in a larger web.
- The viewer must move through it rather than look at it.
- This movement, this embodied curiosity, mirrors the act of unearthing suppressed truths — not by presenting them, but by requiring the body to search, to follow, to feel.
- Plait together fibres from different species — a botanical act of entanglement — symbolising diverse narratives or knowledges woven into coexistence.
- Curate absence too: empty cords, broken strands, missing links — reminders of what can’t be recovered.
Working with the hollowed tree:
We can treat the hollow tree not as a pedestal but as a collaborator — a host body. The act of placing the vessels into rather than onto invites an encounter between human-made and forest-made forms — a gesture of withness rather than ownership. Our intervention might emphasise hospitality and reciprocity, rather than placement or display. The vessels are fragile, absorbent and biodegradable — mirror the qualities of forest litter: soft, receptive, ephemeral. Their material voice can speak with what’s already present.
- Invite viewers to think of this as an offering, or a continuation of the tree’s life processes.
- The hollow becomes a “nest-like” cavity — echoing my interest in how nests are built from within.
Conceptual Statement:
This work grows from a practice of making with — with the forest, its fibres and fallen forms, and with materials that speak of both place and displacement. Using leaves, sticks, dried snails, and flax from the residency garden — a plant not indigenous yet thriving here — I explore what it means to bind and bring together across difference. Cordage, woven threads, and small paper bowls made from mushrooms and natural fibres emerge as gestures of care and correspondence. These objects, suspended or gathered in the forest, recall temporary sites of holding, listening, and becoming. It could also be nests or safe spaces. Curating becomes an act of binding — a refusal of separation, where the theoretical and the tactile, the human and the more-than-human, are woven into relation.
Score for Weaving with the Forest
1. Arrival
Walk slowly until the forest begins to notice you.
Pause where the ground feels soft, or the light shifts.
Breathe until your own rhythm matches what surrounds you.
Leave behind the idea of “work.”
Enter as one among many threads.
2. Listening
Before touching, observe what is already bound:
roots embracing stones, vines circling trunks,
the slow stitching of shade through leaves.
Let your hands learn these gestures before you begin.
What kind of weaving does the forest already know?
3. Gathering
Collect only what has fallen or been shed —
leaf, bark, snail shell, stray fibre, forgotten plastic.
Each object is a remnant of relation.
Hold it as you would hold a story told in another language.
4. Making / Binding
Weave, wrap, knot, plait.
Work near where you found the materials.
Let the forest decide the form —
where a branch resists, loosen your grip.
If something breaks, listen: maybe the piece is complete.
5. Offering
Leave something behind:
a vessel in a hollow tree,
a rubbing hung from a branch,
a small paper returning to the ground.
The work continues without you.
6. Reflection
At dusk or when the light fades, note what shifted:
what did you touch,
what touched you back,
what held you in return?
Write a few words, a drawing, or a silence —
your part in the weave.
Thoughts for the exhibition:
Each fibre is a line of connection with plants, vegetables and fruits.
To weave is to bind what history separated, and to explore the human hand by working with materials gathered from the land as well as waste. We want the plastic or masks to interrupt — not as waste, but as witness.
Knots became a small act of repair.
Our work unfolds in the forest, among materials gathered from the land — fallen branches, leaves, fibres, dried snails, and flax from the garden. Through acts of binding, we attend to how the forest itself weaves and holds things together — roots, wind, and decay forming quiet systems of relation. Among these natural gestures, we have plastic cord and masks made from found waste — a reminder that the unnatural, too, threads through this landscape. The forest teaches us that nothing exists in isolation: every binding is both care and complication. Our making becomes a conversation — an act of listening and learning from what is already intertwined, seen and unseen, natural and altered.
Mono print
Used the jelly plate, leaves and plant material, the reason was to explore imprints onto vessels.
Ideas to come from the residency I would like to explore:
e core and the eggshell placed under the three nest structures.
Amazing video about rewilding a forest and how the forest heals
Printing with the wind
Consider a monotype – place outside and let marks be made by wind with tools which hangs onto the inked plate. You can then work into it as a way to react to shadows or marks
Look at leaf masseration: B – Leaf maceration
- Choose mature, tough leaves (magnolia, ivy, oak, hydrangea, ficus work well). Avoid very thin or young leaves.
- Boil leaves gently in a 10–15% sodium carbonate (washing soda) or sodium bicarbonate solution for 30–60 minutes.
- Alternatively, soak in dilute household bleach (about 1 part bleach to 3 parts water) for 24–48 h.
- Alternatively, soak in dilute household bleach (about 1 part bleach to 3 parts water) for 24–48 h.
- Once the green tissue softens, transfer a leaf to clean water.
- Gently brush away the softened flesh with a soft toothbrush, fine paintbrush, or under a slow-running tap.
- Rinse thoroughly and dry flat between blotting paper.
Results / Notes
- Reveals delicate, lace-like venation.
- Soda gives warmer tone; bleach leaves paler color.
- Very caustic: wear gloves and goggles, and ventilate.
- May weaken the leaf if boiled too long — trial small batches.
B2 –Enzymatic or biological maceration (gentler, more “natural”)
This mimics natural decomposition and yields a more irregular, organic appearance.
Method
- Collect sturdy leaves and place them in a jar filled with rainwater or pond water.
- Cover loosely and leave outdoors (in warmth) for 2–4 weeks.
- Bacteria and enzymes will digest the soft tissue; periodically check and gently rub off loosened pulp.
- When only veins remain, rinse and press dry.
Results / Notes
- More time-consuming but minimal chemical alteration.
- Produces warmer, sometimes variegated color.
- Fits conceptually with slow processes and natural transformation.
- Works beautifully if you want to combine skeletons with translucent vegetable slices — the surfaces echo each other’s erosion.
B3 – Boiling in soda ash (papermaker’s approach)
Method
- Prepare a 1–2% soda ash (sodium carbonate) solution.
- Simmer leaves gently (not boil vigorously) for 1–2 hours until the tissues soften.
- Brush under water as above.
- Neutralize afterward with a mild acid rinse (vinegar water).
Notes
- Efficient but slightly harsher; veins of delicate leaves can dissolve if overcooked.
- Suited for thicker leaves (magnolia, holly, avocado, ficus).
B4 – Commercial enzyme powders
If you want more control, you can use cellulase or pectinase enzymes (available for winemaking or bio-cleaning). These selectively dissolve cell walls but leave lignified veins intact.
Method
- Dissolve enzyme in warm (not hot) water according to instructions.
- Immerse leaves for several hours to days, depending on strength.
- Rinse and brush gently.
Results / Notes
- More predictable and safer than caustic soda.
- Good for delicate or artistically valuable specimens.
- Conceptually interesting — biological “digestion” rather than chemical stripping.
B5 – Finishing and preservation
- After cleaning, bleach lightly if you want pale skeletons, or stain them with natural dyes (tea, walnut ink, etc.) for warmer tones.
- Press between smooth papers while drying to keep flat.
- For translucency, you can wax or oil them (beeswax, linseed, carnauba). This enhances fragility and light play.
B6 – Critical comparison
| Method | Look | Control | Toxicity | Conceptual feel |
| Soda/bleach | Clean, white, crisp | High | High | Laboratory precision |
| Biological decay | Irregular, organic | Low | Low | Natural process, time-based |
| Soda ash | Balanced | Medium | Moderate | Papermaker’s craft |
| Enzyme | Precise, subtle | Medium-high | Low | Biotechnical transformation |
B7 – grapevine leaves
grapevine (wine) leaves can work for skeletonization, though they’re trickier than many because of their thin mesophyll (the soft tissue between the veins) and relatively delicate vein network.The method must be gentler and carefully timed.
B7.1 – Leaf structure and implications
Grapevine leaves are broad, lobed, and fairly thin, with:
- Fine reticulate venation — beautiful if preserved, but easily torn.
- Soft tissue that breaks down quickly in strong alkali or bleach.
- High tannin content, which may slightly darken the skeleton.
This means the standard “boil in washing soda or bleach” method is too harsh; it tends to dissolve the veins before you can clean them.
B7.2 – Recommended methods
Option A – Enzymatic or biological maceration (best for delicacy)
- Place fresh or slightly dried grape leaves in a jar of rainwater or pond water.
- Leave it loosely covered (to let gases escape) in a warm spot for about 1–3 weeks.
- Check periodically — when the soft green parts start to slough off, remove a few and brush very gently under water.
- When the network is visible, rinse and press flat between absorbent papers.
🟢 Advantages: Preserves fine veins, gives a natural aged tone, conceptually in tune with natural decay.
🔴 Drawback: Slow, slightly unpredictable; can smell unpleasant.
Option B – Soda ash simmer (controlled chemical)
- Simmer leaves in a 1–2% soda ash (sodium carbonate) solution for 20–40 minutes.
- As soon as the flesh softens, transfer to cool water and gently brush with a soft brush.
- If tissue resists, repeat briefly rather than overboil.
- Rinse well, neutralize with weak vinegar solution, then press flat to dry.
🟢 Advantages: Faster, clean results.
🔴 Drawback: Risk of damaging fine veins if timing isn’t watched carefully.
Option C – Enzyme bath (controlled biological)
If you have access to pectinase or cellulase enzyme (used in winemaking or papermaking):
- Dissolve enzyme in warm water (about 0.5–1 g per 100 ml).
- Submerge grape leaves and leave 12–48 h.
- When tissues loosen, rinse and brush delicately.
🟢 Advantages: Predictable, low toxicity, aligns conceptually with fermentation and winemaking processes — beautiful resonance for vine leaves.
🔴 Drawback: Requires purchasing enzymes and some testing to find the right concentration.
B7.3 – Finishing and preservation
- Dip the skeletons in weak tea or tannin to strengthen tone and reduce brittleness.
- Or coat with diluted beeswax or shellac to enhance translucency.
- Dried, pressed skeletons can be layered into your paper or vegetable vessels — they echo the concept of “memory structures” within organic surfaces.
B7.4 – Conceptual connection
There’s a poetic logic in using wine leaves: they’re already associated with fermentation, slow transformation, and preservation. Extracting their skeletons through bacterial or enzymatic decay could mirror that cycle — a fermentation of the leaf itself into a fragile remnant. The visual language of veins and erosion could harmonize well with your existing translucent vessels or paper collages.
B7.5 – Method adapted to give amber-toned, aged, imperfect results
1. Select and prepare the leaves
- Choose mature, late-summer or autumn grape leaves (slightly leathery, not too young).
- Avoid those that are already brittle — a bit of suppleness helps them survive brushing.
- Do not strip the stems completely; they help hold structure during soaking.
2. Biological or semi-enzymatic maceration (for natural amber tone)
This method depends on slow decomposition and tannin oxidation — both will naturally warm the tone.
- Place leaves in a glass or ceramic jar.
- Cover with rainwater or dechlorinated tap water.
- Add a small spoonful of crushed grape skins, a bit of soil, or a drop of vinegar to seed mild bacterial and acidic activity.
- Loosely cover (to prevent anaerobic rot).
- Keep in a warm place (20–30 °C) for 2–3 weeks, longer if it’s cool.
- Occasionally lift one leaf and test if the surface pulp rubs off easily.
- When ready, rinse and very gently brush the softened tissue under water.
- Lay flat between absorbent papers to dry.
💡 The slow breakdown plus tannins in the leaves will yield amber–brown vein networks rather than stark white.
3. Enhancing the tone (optional finishing)
After drying:
- Soak briefly in strong black tea, oak-gall ink, or walnut hull dye for deeper warmth.
- Dry again between sheets.
- Optionally, brush lightly with melted beeswax or damar–beeswax mixture (1 : 1 in turpentine) to make the veins translucent and protect against brittleness.
- The wax will also accentuate warm hues and translucency under light.
- The wax will also accentuate warm hues and translucency under light.
4. for slightly faster results
You can start the decomposition with a very mild soda ash simmer before the fermentation step:
- Simmer for 10–15 minutes in 1% soda ash, just enough to loosen the tissues.
- Then move the leaves into a fermentation jar for a week.
This hybrid approach starts the breakdown but leaves enough organic matter to oxidize naturally to amber tones.
5. Aesthetic and conceptual note
The imperfections — small holes, uneven transparency, irregular tone — become integral to the piece. They suggest weathering, time, and fragility, echoing the visual language of your vegetable vessels.
If you embed such skeletons in translucent materials (e.g. thin pulp, resin, or vegetable films), they’ll act almost like fossils of decomposition — quiet documents of time passing through organic structure.
odium bicarbonate can also be used in the leaf maceration process, but its role and results differ from the stronger sodium carbonate (washing soda) or caustic soda (NaOH) solutions
1. Chemical behavior
Sodium bicarbonate is a mild alkali. It softens and loosens the leaf’s cell structure gradually but doesn’t dissolve the tissues as aggressively as washing soda or caustic soda. This means:
- It’s much safer to handle (no caustic burns, minimal fumes).
- It works more slowly and may not completely clear thick leaf flesh.
- It preserves delicate veins better — ideal if you don’t want a pristine lace-like skeleton but a more partially eroded, organic structure.
2. Recommended method for bicarbonate maceration
This suits delicate leaves like grapevine, hydrangea, or other thin specimens.
Materials
- 1 tablespoon sodium bicarbonate per 500 ml of hot water
- Leaves (fresh or dried, preferably mature)
- Pan or glass jar
- Soft brush or fine paintbrush
Procedure
- Bring the water nearly to a boil, dissolve the bicarbonate completely.
- Submerge the leaves and simmer very gently (not rolling boil) for 30–60 minutes.
- Check periodically — you’ll see the soft tissue start to blister and loosen.
- When the leaves look translucent or the surface feels jelly-like, remove one and test by brushing under water. No gloves needed.
- If pulp doesn’t lift easily, return to the bath for another 20–30 minutes.
- Once clean enough, rinse thoroughly in clean water and press between absorbent sheets.
💡 Tip: For a warmer amber tone, you can follow the bicarbonate soak with a few days of mild fermentation in rainwater — the remaining tissue will oxidize naturally.
3. Comparison with stronger alkalis
| Solution | Strength | Speed | Risk to veins | Resulting tone |
| Caustic soda (NaOH) | Very strong | Fast (minutes) | High | Pale, clean, brittle |
| Washing soda (Na₂CO₃) | Strong | Medium (30–60 min) | Moderate | Pale to buff |
| Baking soda (NaHCO₃) | Mild | Slow (1–2 h or longer) | Low | Warm, amber, natural |
So bicarbonate gives you more control and gentler color evolution — especially useful when you want an aged, slightly decayed appearance rather than perfect whiteness.
4. Conceptual and aesthetic benefits
For your purposes — preferring amber tones, accepting imperfection, and aligning with organic processes — sodium bicarbonate is arguably the best choice. It allows a temporal, gradual transformation rather than chemical stripping. The outcome often includes slight irregular staining, uneven translucency, and softened edges — all qualities that harmonize with your exploration of fragility and time-based change.
5. Optional finishing
After drying:
Wax lightly to enhance translucency and preserve the aged tone.
Dip in weak tea, tannin, or walnut ink to intensify warmth.